A few days ago I promised to tell you all about my new astrophotography setup, and today's the day. Let's start with a picture:
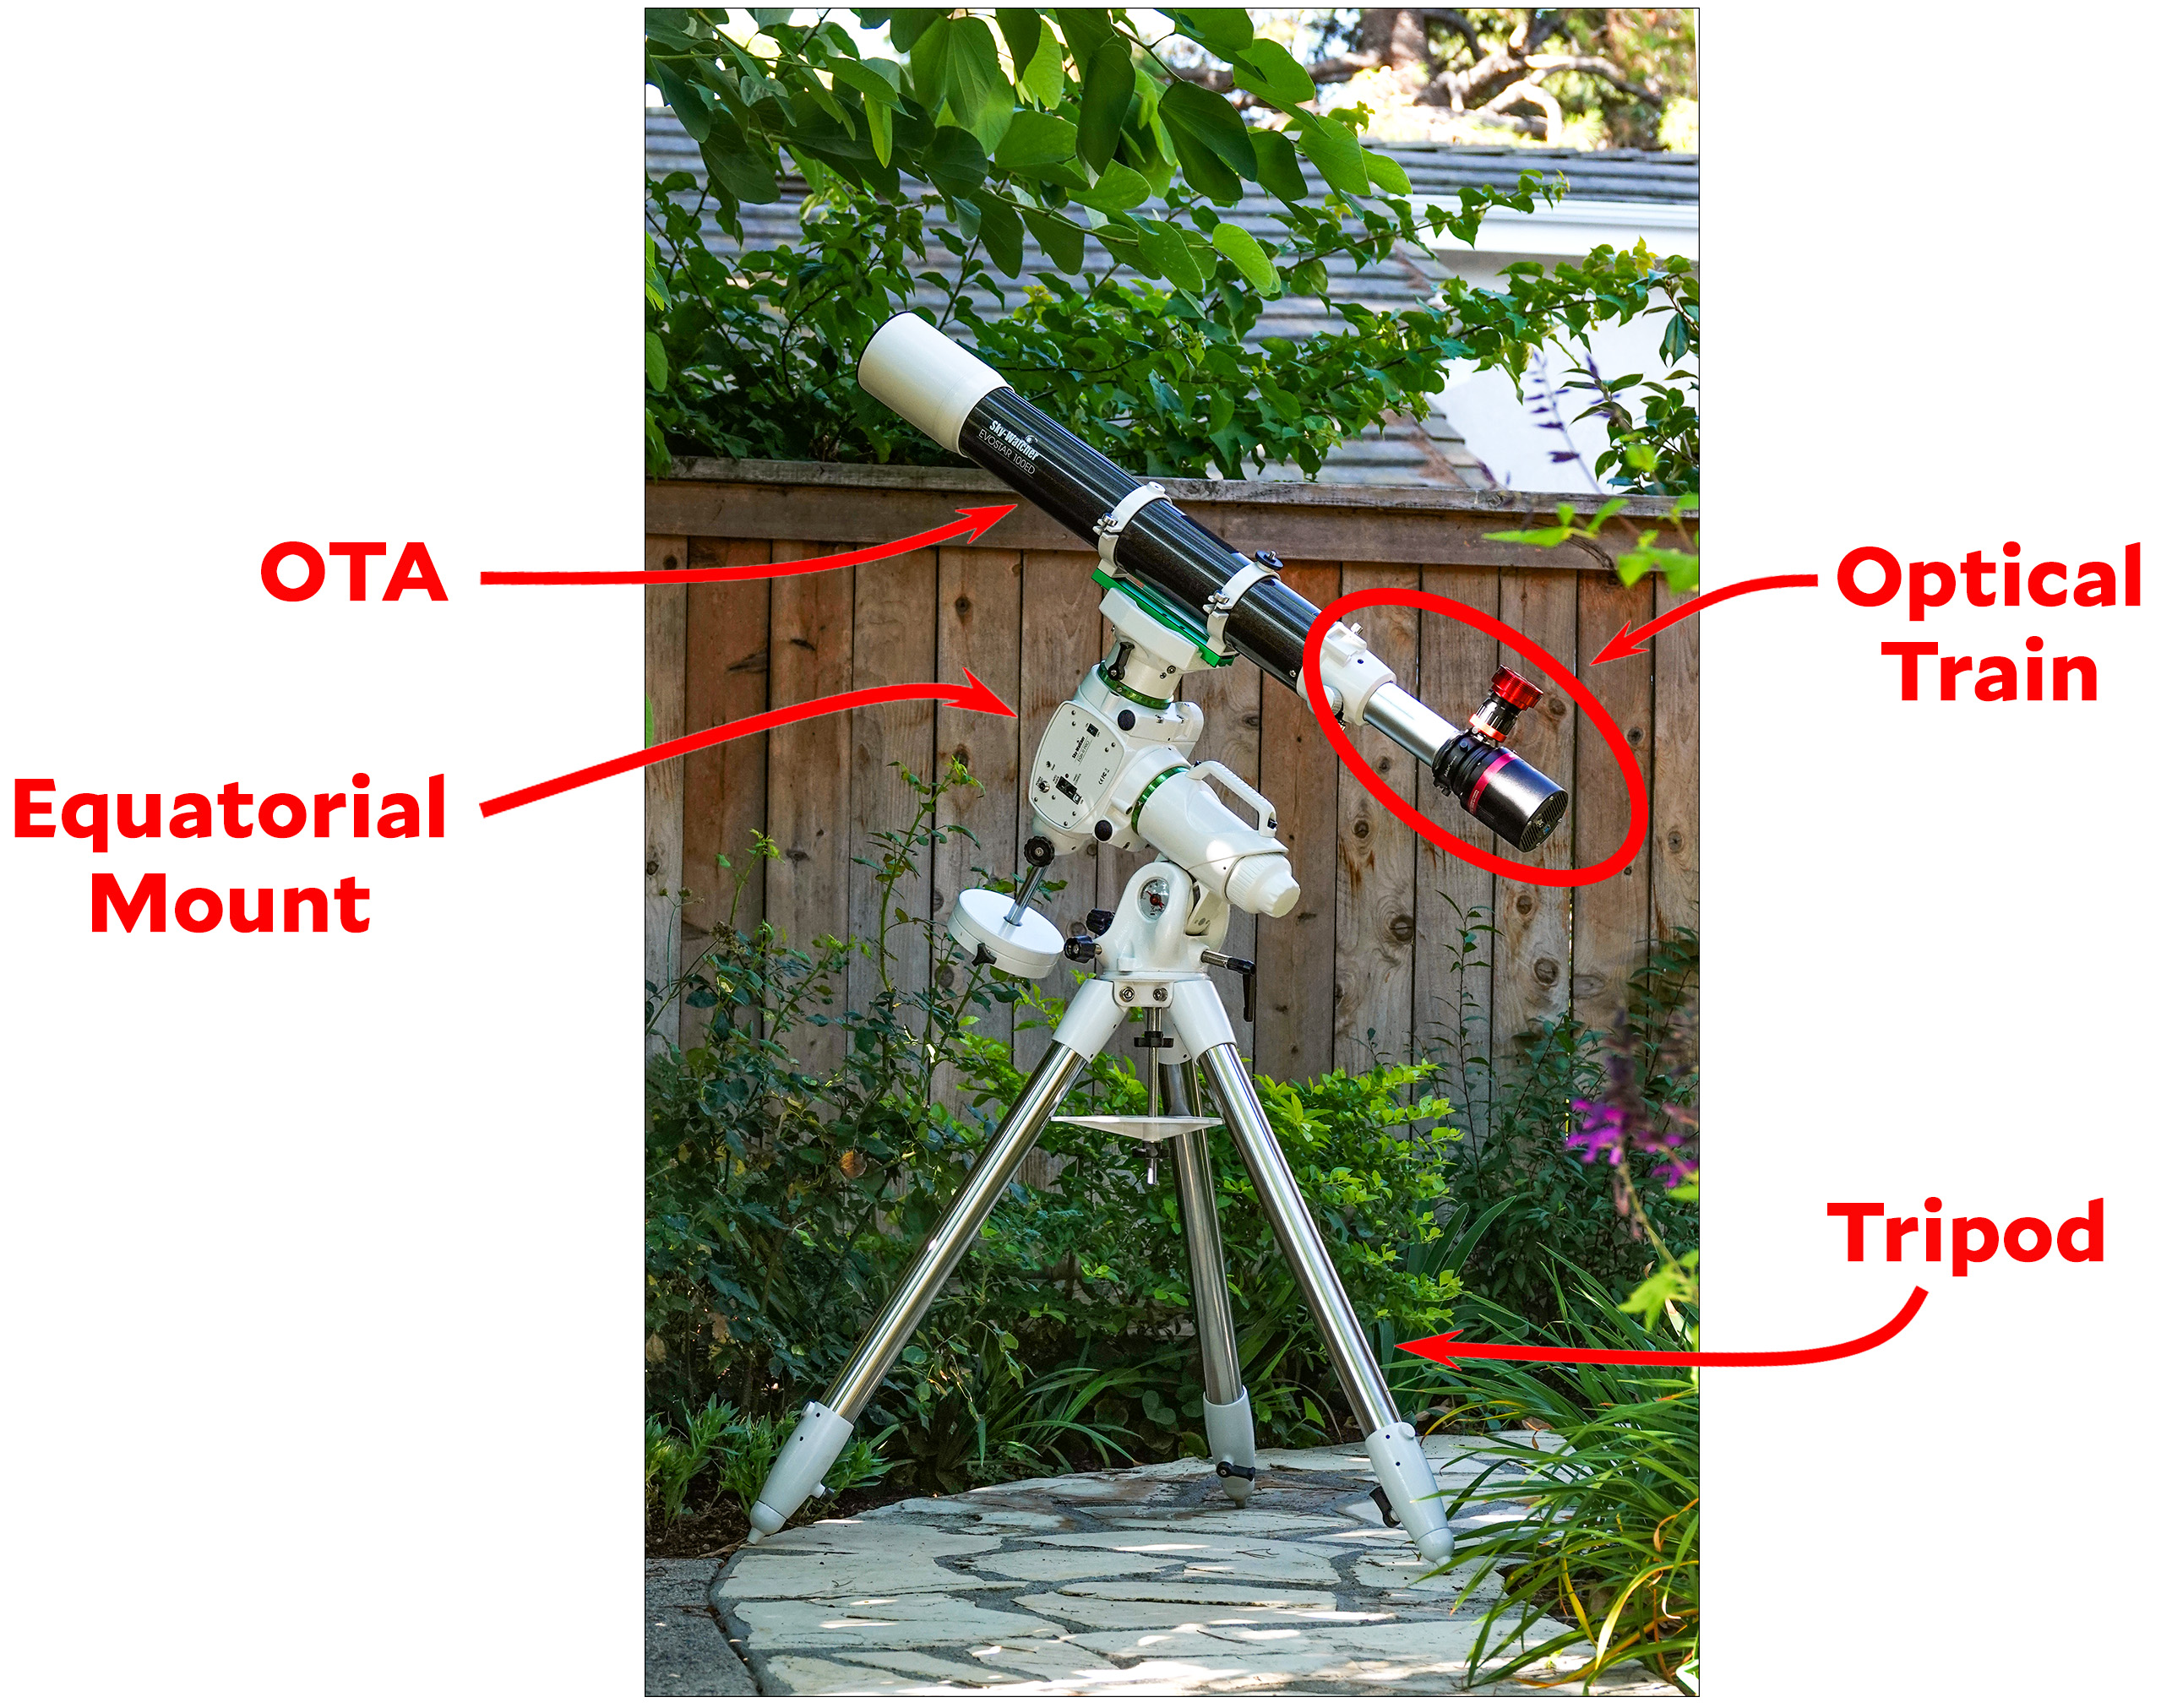
The four main parts are:
OTA stands for Optical Tube Assembly—more commonly known as a "telescope." Mine is a Skywatcher ED100 apochromatic refractor. ED means "extra-low dispersion" and refers to a particularly high grade of optical glass. 100 is the diameter of the objective lens in millimeters. In the US, this size of telescope is usually referred to as a four-inch. Apochromatic is a lens design that's become very affordable in recent years. It focuses all three colors at precisely the same point and, in combination with the ED glass, produces unusually low chromatic aberration. (Mine is a doublet APO, which means the lens assembly contains two lenses. More expensive models are triplet APOs.) Finally, refractor just means that the telescope uses lenses rather than a mirror.
The focal length of the telescope is 900mm, which is a little longer than most people recommend for a beginner, but my goal is to take pictures of DSOs, or Deep Sky Objects, such as nebulae and galaxies, and for that I wanted a little more reach in the optics. The downside of this is that it has an aperture of f/9, which is fairly slow. This means that I have to take longer exposures than I would if I had a faster telescope.
The equatorial mount is a motor drive that moves the telescope in the opposite direction of the earth's rotation. This keeps objects in the same place even during long exposures of a minute or more.
My mount is a Skywatcher EQ6-R. This is a very nice mount, and it's more than I wanted. However, the EQ5 was out of stock everywhere, so I went ahead and got the EQ6 instead. I don't mind the extra cost too much, since I may very well need the better mount in the future, but damn, this thing is heavy. I have to break down and put together the entire setup whenever I go somewhere, and placing the mount on top of the tripod is the only part that's really a pain in the ass.
The optical train contains all the stuff that allows me to take pictures. More on that later.
The tripod is just a tripod. It's a big, super stable tripod, but there's nothing more to it.
So that's basically the whole setup. When I set it up for a shooting session, it goes like this:
- Set up tripod facing more-or-less north. If necessary, level the tripod.
- Place mount on tripod. Use a compass to get it closer to pointing north. Later on, software will be used to get the mount pointed precisely to the North Celestial Pole (NCP).
- Attach OTA to mount. This is done via a dovetail mounting bracket.
- Attach the optical train.
- Attach power cables to my power supply and USB cables to my laptop.
- Done!
Next up, here's a close-up of the optical train:
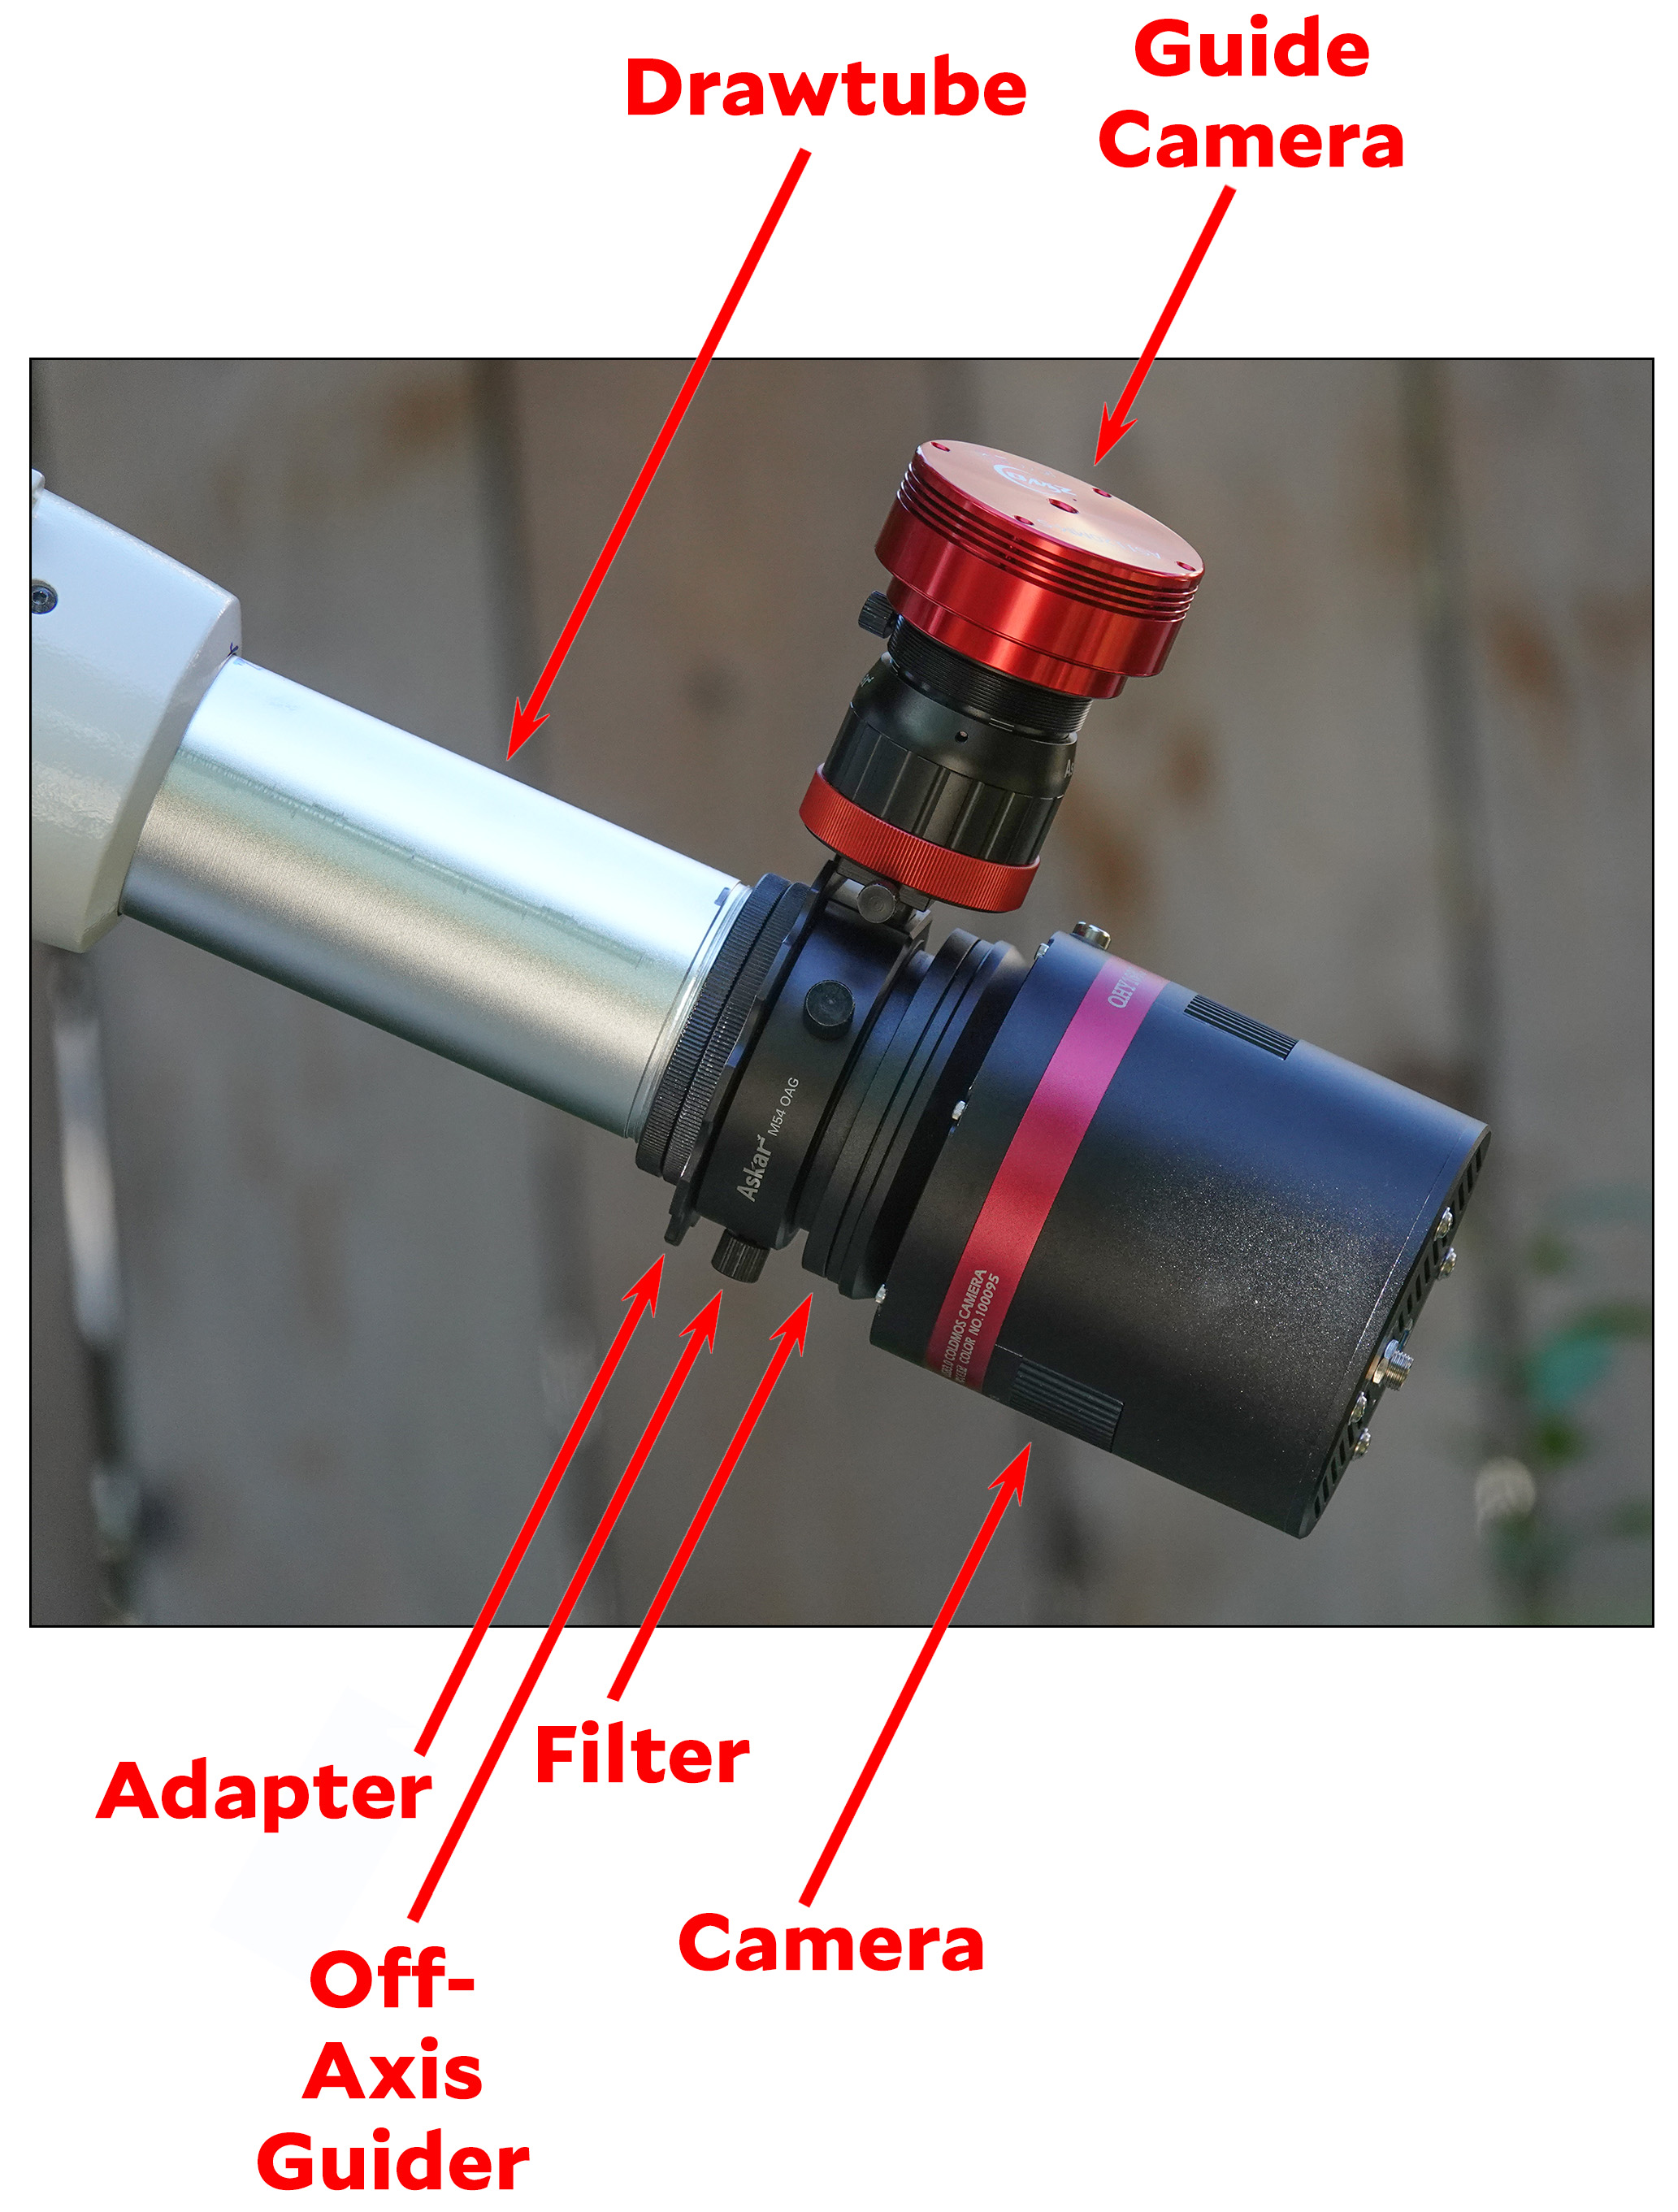 The drawtube is controlled by the focusing knobs and moves the optical train in and out. My telescope uses a Crayford style focuser, and it's not that great. I'm planning to replace it with a PrimeLuce Esatto 2" electric focuser.
The adapter transforms the M56 threads on the drawtube to M54, which everything else uses. The numbers are in millimeters.
The off-axis guider (OAG) is an Askar with a 10mm prism. The prism draws off a small bit of the image from the telescope and sends it up to the guide camera.
The guide camera is a ZWO ASI120MM-S. The S, apparently, means that it supports USB 3.0, which it turns out I need. I'm still not entirely sure why. In any case, equatorial mounts never compensate perfectly for the rotation of the earth, so a guide camera is used to lock onto a star and produce occasional pulses to keep the mount precisely on target.
The filter holder is just what it sounds like. There are lots of useful filters you can get, including simple light pollution filters, sun filters, moon filters, and so forth. However, the most common use of filters is to capture separate exposures of the various emission lines emitted by nebulae. These are called narrowband filters and the three most common are Ha (Hydrogen-Alpha), S-II (Sulfur-II), and O-III (Oxygen-III). The basic idea is to use a monochrome camera and then capture individual images with each of the filters. The final image is created via specialized software that puts the images together into a high-resolution color image.
At the moment, my filter holder is empty. I don't use it at all.
The camera is the heart of the optical train. Mine is a QHY 168c, a color camera that uses a Sony IMX071 APS-C CMOS sensor. This is a 16 megapixel sensor with 4.8um pixels. What makes it specially suited for astrophotography is the built in cooler, which cools the sensor by 30-40°C compared to the ambient temperature. This produces images with far less noise than an ordinary DSLR.
Finally, there's the software. This has improved massively over the past decade or two and now performs miracles. At the moment, the software I use is:
EQMOD to control the mount.
N.I.N.A. is my basic capture software. It connects to everything and controls polar alignment, image capture, camera control, platesolving, and a hundred other things that I don't use. Basically, NINA uses platesolving to figure out where the telescope is pointed and then syncs this information with the mount. After that, you can simply tell NINA what object you want to slew to (the Iris Nebula, for example, is NGC 7023) and NINA will move the scope to the exact coordinates of the object.
PHD2 is used for autoguiding. Pretty much everyone uses PHD2, so I figure I might as well too.
Astro Pixel Processor is currently my program of choice once I get home and need to create a final image. Generally speaking, the way modern astrophotography works is that you use long exposures and lots of images that get stacked together. My Iris Nebula image, for example, used 51 images of 60 seconds each. For better results, I would most likely capture a few hundred images of 2-3 minutes each. Or maybe combine some images of different exposure times. Sometimes it takes a bit of experimentation to figure out the right combination. In any case, APP produces far better stacked final images than any other program I've used (though I can't say that I've used an awful lot of them yet).
Photoshop is my choice for final touch-ups. APP produces pretty good images out of the gate, so I don't need to use Photoshop for much. But I'll usually do a little bit of stretching, as well as adding extra contrast since APP seems to produce generally grayish images.
And that's it! As of last night I believe that I've finally finished the first phase of my new hobby, which is just getting all the software to function. Not function well, just function. The only exception is that I'm still not sure I have autoguiding working. I may be able to find out tonight depending on the weather.
With that done, I can start to actually learn about astrophotography. That is, not just how to take a picture, but how to take better pictures. This is the part I've been looking forward to, and I expect it to occupy me for quite a long time.
Kevin, remember that when you are searching for deep sky objects you are actually peering way back in time. Who knows, if you're lucky, you may be able to observe the childhoods and early careers of Joe Biden, Donald Trump, and most of the Senate.
& Cornpop will still be there... because unlike Levi Sanders's child support, Cormpop actually existed.
Awesome! Have fun, Kevin!
That’s wonderful because… NASA is a disgrace. Shut them down. Refund our money. What a waste.
Defund NASA!
https://twitter.com/StephTaitWrites/status/1565820444846227456?s=20&t=Zt1eQqcCaNT8xJkCKjVv5Q
Oop! While Qevin Drum was prattling on about his telescope, a Neoliberal Shitlib Forever Plandemic Social Distancing from Womb to Tomb Demokkkrat Stooge tweeted out charts (that's Qevin's thing!) showing that it is vanishingly probable that Paedofornia irreparably damaged children's educational attainment by sin of remote learning.
Congratulations on getting your new setup! By now you probably have learned that there are a googol different possible hardware/software combos and several tens of thousands of hours of YouTube videos and Cloudy Nights posts from amateur astrophotographers to glean useful/mind-boggling information from. I sense you have wisely decided to forge ahead without getting totally swamped by the amount of info out there.
A four-inch APO refractor is a very nice choice, and choosing a heavy mount will serve you well - never, never scrimp on the mount. A slow speed f/9 confers advantages as well as disadvantages. I'm guessing you probably don't need a field flattener. And remember, a high focal ratio means that you're not strongly refracting the light, so aberrations are naturally significantly smaller than for faster scopes.
Just for chuckles, maybe give a try at Epsilon Lyrae, the famous "double double", a pair of double stars. Many advantages here, they are right next door to Vega, so they're super easy to find, without software, and all four components are bright, magnitude 6 or brighter. So you can observe them without traveling, in light-polluted suburbia. Plus, I'll bet you can catch them with a single one-second exposure, so autoguiding is unnecessary. The fine separation of 2.3 arcseconds is a great test of the resolving power of your scope. A high-end four-inch refractor like yours should show the splittings very cleanly and sharp.
Above all, have fun. Best of luck.
It looks like your scope/mount combo is very similar to what Helena* uses, although she of course has the slightly bigger triplet APO:
https://www.youtube.com/c/HelenasAstrophotography/videos
https://www.youtube.com/watch?v=OLU6NOS6lRs&t=105s
*One of a number of astrophotography vloggers, very accomplished while fighting the often-terrible Scottish weather.
Thank you Kevin. Well done. You deserve this. Looking forward to more photo's. Good luck.
Finally, an opportunity to use my favorite scientific factoid. Years ago, in an intro to astronomy course, the professor introduced the inverse square law which states that "The Apparent Brightness (B) of a source is inversely proportional to the square of its distance." He noted that this is the second most important use of the inverse square in Astronomy. The most important use is "The frequency of personal astronomical observations is inversely proportional to the square of the weight of the telescope".
Seems like a lot of trouble to go through for pictures of Charlie and Hilbert…
and I suspect your neighbors have already called the police….
This. Is. Effing. Amazing.
I remember the days of film, when you would hypersensitize with gas and cool down the camera - not easy back then. I never did it, but saw dedicated amateur astronomers go that way (a frequent topic in Sky & Telescope magazine). I was a time-consuming path to follow, but they were rewarded by really nice pictures. Also, no computer control, which meant looking at sky charts and manually adjusting the orientation every so often.
Now digital has made film obsolete. Digital is easier and cheaper, although Kevin's set up is moderately pricy. I hope he enjoys what his equipment can do for him.
I have an old Celestron C8, which is bare bones (simple tripod and wedge) and not suitable for photography. Even so, taking it out to the mountains requires patience and strength. Kevin's set up looks very heavy to me. Be careful when setting it in the dark!
The mount comes with a carry handle - a nice touch. To make things even easier, JMI (jimsmobile.com) makes "Wheeley Bars ", a dolly designed for tripods.
WOW! That’s all I can think of to say. Oh, and also Holy shit!
I never thought of myself as easily impressed. Maybe I’ll re-evaluate that…or maybe not.